

Help & Frequently Asked Questions
Frequently Asked Questions (FAQ)
- What Is AboutMyBaby? What's A Baby Scrapbook?
- What Is Pro Membership?
- I'm On A Mac. Can I Use AboutMyBaby?
- Can I Change My Scrapbook URL?
- Logging In To Your Scrapbook
- I Forgot My Password! Help!
- Changing My Password
- I Can't Find A Specific Scrapbook!
- I Need To "Sign In" To A Scrapbook, But Don't Know The Access Code.
- How Can I Protect My Privacy?
- How To Turn On/Off A Scrapbook Visitor Access Code
Basic Site Functions
- Photos: Adding Photos/Albums, Deleting, Printing
- I Need Help Installing/Using The Photo Uploader.
- News (Blogging): Adding, Editing, Deleting
- Videos: Adding, Managing, Editing, Watching
- Baby Stats: Adding Information, Editing
- Mailing List & Email Alerts: Editing
- Guestbook: Editing
- Settings: Site & Account Tabs
- Turning On/Off Or Moving Features In My Scrapbook
- Changing The Look Of My Scrapbook
Preserving your scrapbook
- How Can I Preserve My Scrapbook?
- Why Can Only The Scrapbook Owner Purchase Keepsakes?
- Can I Add More To My Keepsake Later?
- My Home Computer Crashed And I've Lost All My Photos/Videos. How Can I Get My Data Back?
Create A Template
- What Is Create A Template?
- Creating, Copying, Or Editing A Template
- Image Uploading Help
- Color Picking Help
Billing Issues
Still Stuck? Contact Us!
Privacy Policy / Terms Of Service
What Is AboutMyBaby?
AboutMyBaby is a fun and easy online scrapbooking tool made by parents for parents. Customize a family webpage to help you keep friends and family connected to your baby (or baby-to-be) with photos, videos, blog entries and more.
What Is Pro Membership?
AboutMyBaby Pro Subscription is our premium for-pay service. The charts below outline the features that are available to Pro members.
- Photos: take as many pictures as you want and show off an unlimited number of photos
- Photo Albums: organize your photos in an unlimited number of photo albums
- Photo size: each photo may be up to 100MB
- Prints: order prints, calendars, mugs, and other great products
- Video size: each video may be up to 500 MB
- Templates: Access to a wide variety of professional & user created themes
- Create your own Template: Don't see a template that captures the "look" you want? Create your own!
- Guestbook: unlimited number of entries so that everyone can have a chance to leave comments or just say "hi"
- Journal: unlimited number of entries - share all of your family's successes and stories!
- Mailing list: we'll send updates to unlimited number of friends and family
- No advertising
- Premium Templates
- Unlimited Number of Videos
- $6.95 per month (cancel anytime) or $49.95 per year (40% discount)
AMB Pro accounts are free of advertising. Membership costs $6.95 per month (cancel anytime) or $49.95 per year (a 40% discount from the monthly rate). Subscriptions are handled by PayPal and are automatically renewed until you cancel.
I'm On A Mac. Can I Use AboutMyBaby?
Yes, you can!
Our photo uploading tool works on both Macs and PC's, and our engineers program on Macs. If you see any oddities, just let us know and we'll fix 'em.
However, our photo uploading tool will not work with IE on Macs. If you're using a Mac, please use either Safari or Firefox. If you'd like to use IE, you'll need to use Windows.
Can I Change My Scrapbook URL?
Yes! Email us using our contact form. Please provide a 1st & 2nd choice. If your choice is available, it's yours! This is a common request, especially when your family grows!
Logging In To Your Scrapbook
There are two ways to log in to edit and upload new stuff to your scrapbook:
- Go to http://www.aboutmybaby.com and type in the Scrapbook name (as in http://scrapbookname.aboutmybaby.com) and password and you'll be directed to your scrapbook.
- Go to your scrapbook (i.e. http://aureliaviner.aboutmybaby.com) and click the SIGN IN link in the top right corner.
If you have problems logging in, please see the instructions above. If you get really frustrated, just contact us.
I Forgot My Password! Help!
Have no fear, my friend! If you are the owner of a scrapbook and you have forgotten your password, simply click SIGN IN tab on your homepage, then click "Reset Your Owner Password". Follow the steps to have a new, temporary password sent to the email address of record. Note that sometimes AboutMyBaby mail is directed into the JUNK MAIL folder (especially on AOL), so be sure to check in that folder if you don't receive an email within a few minutes.
If after all that you find yourself still stuck, just contact us.
Changing My Password
Change your password if you don't like the one we assigned you or for any other reason you'd like.
- Login
- Click on "SETTINGS" at the top right of your scrapbook.
- Click "Site"
- Then change your password.
NOTE: There are 2 TYPES of passwords on AboutMyBaby - your password you use to log in and EDIT the site, and the Scrapbook Password you can (optionally) use to limit access to the scrapbook to people who have it. You should write down your passwords, especially if you have two of them!
I Can't Find A Specific Scrapbook!
All AboutMyBaby scrapbooks have Web addresses that look like this: http://scrapbookname.aboutmybaby.com
"Scrapbook Name" is the name that the creator of the scrapbook chose - usually the child's first name (i.e. http://aureliaviner.aboutmybaby.com) or something similar. If you can't remember the name of your scrapbook, you can simply send us a note from the email address on record with us and we'll dig it up for you. You may also want to try browsing through our directory. Find the link at the top of the home page.
I Need To "Sign In" To A Scrapbook But Don't Know the Access Code.
If you go to check out a scrapbook and you can only see a sign-in page, this means that the person who created the scrapbook put a special code on the page so that only people with the code can view it. If you don't know the code, simply click the "Ask the owner for the visitor access code" link to request the access code from the site's creator. We will send an email to the creator, and he or she should email you back with the code. (Alternatively, you can just ask them yourself.) We cannot give you the Access code to someone's site. You must get it from the Account owner.
How Can I Protect My Privacy?
AboutMyBaby values your privacy, and respects the trust you have placed in us. We don't sell information to others. As for your scrapbook and the content within it, if you don't want strangers to see pictures of your child, simply put an Access Code on the site (be sure to tell your friends and family so they can get in!). Your privacy and satisfaction is what drives us to make our nifty little site better.
How To Turn On/Off A Scrapbook Visitor Access Code
This feature allows you to prevent anyone who doesn't know the code from viewing the contents of your scrapbook. WARNING - you may end up with a lot of frustrated family members if you don't tell them the code in advance. We WILL NOT give anyone but you information regarding your privacy visitor password.
- Login
- Click on "SETTINGS" at the top right of your scrapbook, then click on "SITE".
- Check the "REQUIRE USERS TO USE A PASSWORD" box and create a passcode.
- Hit "DONE".
- To turn this feature off, simply repeat steps 1-2, and uncheck the "REQUIRE" box.
BASIC SITE FUNCTIONS
Photos: Everything You Want To Know
There are two ways you can share photos on AboutMyBaby - either as "cover" photos that appear on your scrapbook's home page, or as photo albums (for example, "April 2006") that contain many images. Let's discuss each:
Home Page Photo
Put a photo (or more than one) on the "cover" of your child's scrapbook to make your scrapbook look cool and interesting. This is NOT a photo album - see below to learn how to upload and manage photo albums. You can put up as many home page photos as you like on the "cover" of your scrapbook.
To ADD a Home Page photo:
- Log in to your baby's scrapbook.
- Near the top of the page in the drop-down menu, select Home Page Photo, then the side (left or right) of your homepage on which you want the photo to appear, and then click the "ADD" button.
- On the "Add Photo" page, click BROWSE to locate a photo on your computer (either .jpg or .gif), write a brief description and then click "DONE". Your photo will upload (it may take a few minutes) and automatically appear on your scrapbook's home page!
- If you'd like to move it to a different location, you can then drag-and-drop it to another location by holding your mouse down on the gray "drag" text and pulling the photo to another location.
To REMOVE a Home Page photo, simply log in, and click the REMOVE link above the image. The image will turn red. If you didn't mean to remove the image, just click the "Restore" link that appears over the red image. If you really do want to delete the image from your homepage, scroll to the top of the page, and click the "Save Layout Changes" button. It will confirm that you want to remove a photo from your homepage. Click OK, and the photo will be removed from your homepage.
To EDIT a Home Page photo, simply log in and click EDIT link above the photo you want to edit. You can change the caption that appears under the photo. If you'd like to change the photo that appears, just delete the one that's there now, and add another Home Page Photo! You can have as many as you'd like!
To MOVE a Top Page photo to a different place on the page, hold your mouse down on the gray "drag" text and pulling the photo to another location.
Photos: Albums, Adding, Managing, Editing, Deleting
Photo albums are the most powerful part of AboutMyBaby, and probably the area with the most questions. Here's some help.
First, A few important notes about photos:
- AboutMyBaby offers unlimited photo uploading. For optimal viewing by your friends and family, we recommend that you limit each album to 100 photos.
- PLEASE INSTALL OUR BULK PHOTO UPLOADING TOOL (Trouble installing? Here's help). If you don't, you can only upload photos using our basic HTML upload tool. Uploading many photos this way can become a tiresome process that can take a long, long time.
- You should always keep the original photos you upload on your home computer.
To CREATE A PHOTO ALBUM, log in, and then click on "Add A Photo Album" at the bottom of the Photo Album module on your scrapbook's page. Create a title and description, click "Add Album", and then you will be sent to the ADD PHOTO page.
To ADD PHOTOS TO AN ALBUM, follow these easy steps:
- To get to the ADD PHOTO page, log in and either click on an existing photo album or create an album as instructed above.
- If this is your first time uploading, WE STRONGLY RECOMMEND YOU INSTALL OUR PHOTO UPLOADING TOOL (here's help).
- Once the bulk uploader is installed, you will be able to upload multiple photos. Just click the "Choose Photos" button on the page and select one or more photos to upload. After selecting the photos, you will see a preview of the photo and be able to enter a title and a caption for each photo before uploading. Each photo will be given a default title based on the name of the file. You must enter a title for each photo before uploading. You can leave the default title or write in a better one!
- After entering titles and captions for each photo, click the "Upload Photos" button, and the bulk uploader will start uploading each of the photos individually.
- As each photo successfully uploads, you'll see a progress indicator at the top of the page telling you how many photos have been uploaded and how many will be uploaded in total. In addition, as each photo is uploaded, you'll get a link to see that individual photo. That link will open a new window so that your other photos keep uploading properly.
- When all your photos are uploaded, you'll get a final link at the top of the page so that you can see your newly added photos. And you are all done! THAT'S IT!
To EDIT A PHOTO, follow these steps:
In order to edit a photo, you must first be logged in. There are three ways to edit a photo: change the title or caption, rotate a photo, and change the photo album that the photo lives in. Let's look at each of these.
- To change the title or caption of a photo:
- Log into your scrapbook.
- Click on the Photos tab along the top of the page.
- Click on the photo album that contains the photo you'd like to edit.
- Above each photo is a link to EDIT it. Just click that link, and you'll be taken to the Edit Photo page. You can also get to the Edit Photo page by clicking the EDIT link on the single photo page.
- On the Edit Photo page, just enter in any title and caption that you'd like for the photo.
- Once you've entered in the new title and caption, click SAVE CHANGES.
- Congratulations! Your photo has been updated!
- To rotate a photo:
- Log into your scrapbook.
- Click on the Photos tab along the top of the page.
- Click on the photo album that contains the photo you'd like to edit.
- Above each photo, you'll see two arrows. Clicking the arrow on the left will rotate the photo 90 degrees counter-clockwise. Clicking the arrow on the right will rotate the photo 90 degrees clockwise. You can click each arrow as many times as you'd like to get the photo oriented the way you'd like.
- Once the photo is oriented in the direction you'd like, scroll to the top of the page and click the SAVE CHANGES button.
- Each rotated photo will be sent to the server for processing, and you'll see a progress indicator as each one processes.
- When all the photos have been processed, the page will reload and you'll see your images rotated.
- Congratulations! Your photo has been rotated!
- To change the photo album in which a photo lives:
- Log into your scrapbook.
- Click on the Photos tab along the top of the page.
- Click on the photo album that contains the photo you'd like to edit.
- Above each photo is a link to EDIT it. Just click that link, and you'll be taken to the Edit Photo page. You can also get to the Edit Photo page by clicking the EDIT link on the single photo page.
- On the Edit Photo page, you will see a dropdown menu labelled "Move Photo To" and a list of the photo albums in your scrapbook. Just select the photo album you'd like to move your photo to from the menu.
- Once you've selected the new photo album for your photo, click SAVE CHANGES.
- Congratulations! Your photo has been moved!
To REORDER PHOTOS WITHIN AN ALBUM, follow these steps:
- Make sure you're logged in, and go to the album's page (the page that shows all of the photos as small thumbnail images).
- Click the REARRANGE PHOTOS button on the left hand side.
- You will see a page that shows you thumbnails of all your photos. Just click on any photo and drag it to the new location in the photo album. Note that the photo album cover will be the first image in the album.
- When the photos are in the order you'd like, click the SAVE CHANGES button at the top right.
To DELETE ONE OR MORE PHOTOS, follow these steps:
- Make sure you're logged in
- Click on the Photos tab along the top of the page.
- Click on the photo album that contains the photo you'd like to edit.
- Above each photo is a link to DELETE it. Click that link, and the photo will be covered in red. If you didn't mean to delete the photo, just click the RESTORE link that appears above the photo.
- Click the Save Changes button in the top right of the page. You will see an indicator message that shows you the progress in deleting the photos you selected.
You can also delete any individual photo from the edit photo page. To delete a photo from the Edit Photo page, follow these steps:
- Log into your scrapbook.
- Click on the Photos tab along the top of the page.
- Click on the photo album that contains the photo you'd like to edit.
- Above each photo is a link to EDIT it. Just click that link, and you'll be taken to the Edit Photo page. You can also get to the Edit Photo page by clicking the EDIT link on the single photo page.
- On the Edit Photo page, click the DELETE PHOTO button and your photo will be deleted.
To DELETE A PHOTO ALBUM, follow these steps:
- Log into your scrapbook.
- Click on the Photos tab along the top of the page.
- Below each album is a link labeled REMOVE. Click the REMOVE link. The album will turn red. If you didn't mean to remove the album, click the RESTORE link that appears below the album.
- Scroll to the top of the page, and click the SAVE CHANGES button.
To CHANGE THE ORDER OF YOUR PHOTO ALBUMS, follow these steps:
- Log into your scrapbook.
- Click on the Photos tab along the top of the page.
- Each album has a grey DRAG icon above it. Click that icon and drag-and-drop the photo albums to order the way you'd like.
PHOTO PRINTING: AboutMyBaby has partnered with QOOP, a high-quality photo provider, to offer prints, photobooks, calenders and other merchandise with your child's photos. For any printing-related concerns, contact QOOP.
I Need Help Installing/Using The Photo Uploading Tool.
AboutMyBaby offers a simple and very easy-to-use photo uploading tool to easily and quickly get your photos on our site. It allows you to upload multiple photos at a time, as well as set the title and caption before uploading the photos. This safe, simple tool works on Windows, Macs, or Linux using Internet Explorer, Firefox or Safari.
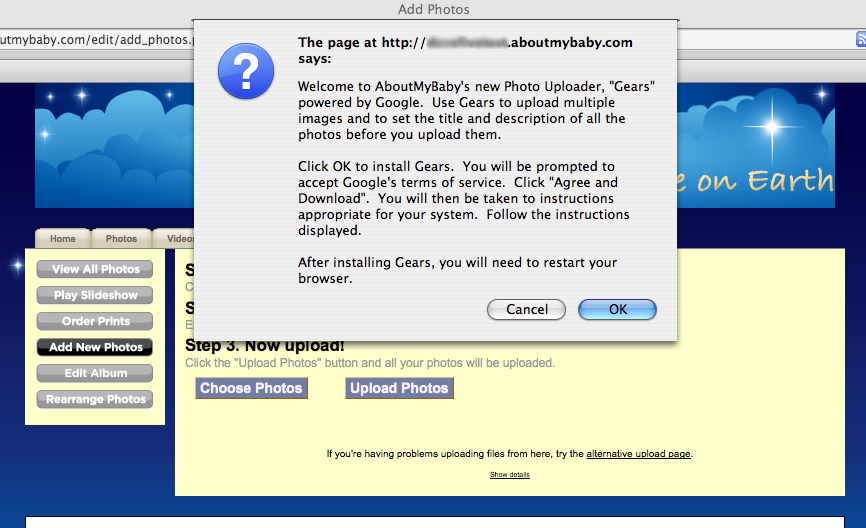 The first time you try to use the uploader, you will be prompted to install Gears. You will see a prompt like the image to the left. Gears is a completely free plugin that enables the multi-file upload. You only need to install it once.
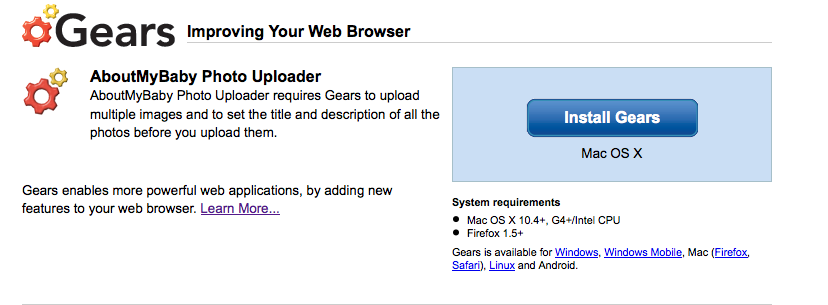 After clicking OK, you'll be directed to the Gears installation page. Click the "Install Gears" button on the right side of the screen. The installation process will detect what operating system and browser you are using so that it installs the correct browser plugin. Therefore, the install screen you see may have different text than the image to the right.
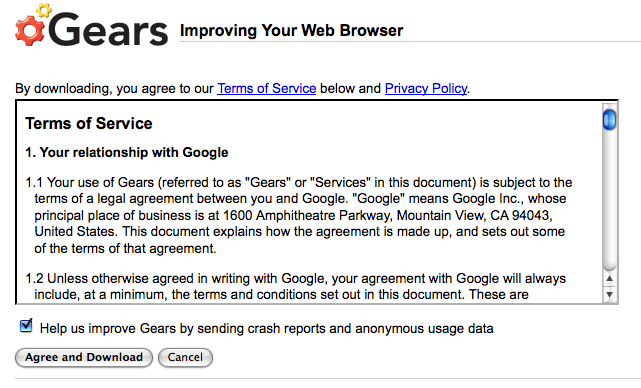 After clicking "Install Gears", you will be prompted to agree to the Google terms of service. You will see a screen similar to the one on the left. Click the "Agree and Download" button. Depending on the operating system and browser you use, you'll see slightly different screens. Just follow the directions on screen to complete the installation. You'll need to restart your browser, but you will be taken back to the AboutMyBaby upload page.
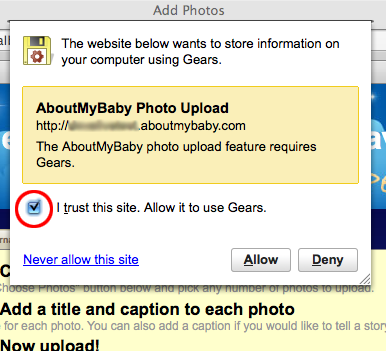 After installing Gears and restarting your browser, you will need to grant permission for AboutMyBaby to store information in your browser. The prompt will look like the image to the right. Click the checkbox next to "I trust this site" and then click the "ALLOW" button. The uploader only stores the title and caption of each photo before you upload it. So type in your titles first and then click "Upload."
That's it! You're done! Once you've installed Gears and granted permission to store data locally, you are all set! Now you can upload multiple photos quickly and easily! You only need to follow these instructions once for each browser that you use. If you use different browsers, you will need to follow these steps for each browser.
News (Blogging): Adding, Editing, Deleting
Adding, editing and deleting news stories is very simple and straightforward. Simply log in and click LATEST NEWS at the top of your scrapbook. From there you can ADD a story, or edit or delete your existing stories by clicking the links next to the relevant story. Remember to be logged in or you won't see the links!
When you create a news entry, you can also choose from our list of MILESTONES to highlight a particular event. When you select a milestone, we add a cute icon next to the story and highlight that entry with a different color. Nifty, huh?
Videos: Adding, Managing, Editing, Watching
Got digital video? Great - put it up and share it with your friends and family! We accept short videos in any format. Pro members can have an unlimited number of videos. You and your family must have the Flash player to watch videos. You can always download the latest version of Adobe Flash at http://get.adobe.com/flashplayer.
Videos are limited to 500 MB, as your upload may time out if it's more than that. Videos are not put into albums, and are simply listed in the order they are uploaded.
To ADD video, follow these steps:
- Make sure you're logged in
- Click on the Videos tab along the top of the page.
- Click the ADD A VIDEO link
- Enter a title and description for your video. Your friends and family will see the title and description, so make it good!
- Use the "browse" button to locate your video. After selecting your video file, you will see the file name and file size appear on the page. If you accidentally picked the wrong file, just click the "Select different file" button and pick the right video file.
- When you're ready, click UPLOAD TO YOUR SCRAPBOOK. Then relax, because it's a big file and it could take a little while. As the upload progresses, you will see a progress indicator on the page that tells you how much has been uploaded.
- The upload is complete when you see a link to view your new video.
Your video will be processed shortly after upload. Normally, videos are processed within 10 minutes of uploading. Before your video is processed, you will see a message saying "Your video is being processed. Please check back soon." If your video does not appear within 10 minutes, please contact us and include the URL of the video.
To EDIT a video, follow these steps:
- Make sure you're logged in
- Click on the Videos tab along the top of the page.
- Click the Edit link below the video. This will take you to the Edit Video page.
- On the Edit Video page, you can edit the title and caption for your video. Just enter in whatever you'd like it to be.
- Click the SAVE CHANGES button, and you're done!
To DELETE a video, follow these steps:
- Make sure you're logged in
- Click on the Videos tab along the top of the page.
- Click the Delete link below the video. This will turn the video red.
- Scroll to the top of the page, and click the SAVE CHANGES button. This will remove the video from your scrapbook.
Stats: Adding Information, Editing
The stats module is one of our coolest features - it tracks your child's age, and allows you to post stats like your child's birthweight, latest tricks, etc. It's automatically turned on when you first sign up for a site, and you can edit it at any time.
You can add additional Stats modules so that you can have one for each of your children. You can do this with the "Add module" tool on the upper left of your homepage after you log on.
To EDIT any information in the Stats module, log in and click the EDIT link above the module. Once you're in edit mode, you can ADD additional stats by clicking the "ADD ANOTHER FIELD" button.
Mailing List & Email Alerts
This is the most useful and easy-to-use features on the site. Our email alert feature automatically sends a message to the people on your mailing list whenever you add news stories, photos or videos to your scrapbook. You can set alerts to happen daily (one email at the end of the day, regardless of how many photos or stories you post) or weekly (one email at the end of the week).
We STRONGLY encourage you to use this feature so friends and family can stay in touch with their favorite baby!
Of course, anyone who doesn't want to be on the list can unsubscribe themselves by following instructions contained in every email sent. Lastly, AboutMyBaby doesn't do anything with the email addresses you provide - we don't advertise to those people or sell lists - we simply send them a note when you update your site.
Email addresses get on your mailing list in one of two ways - either you put them on the list, or site visitors put their own email addresses on the list.
To ADD AN EMAIL ADDRESS:
- Log in to your baby's scrapbook.
- Click on the "Settings" tab on the right side of the page.
- Click on the "Mailing List" tab on the left side of the page.
From here, you can quickly add new email addresses to your mailing list.
For your site visitors to put their own email addresses on that list, they can go to your scrapbook's home page, and simply enter an email address (joe@joe.com, etc) into the Mailing List module provided and click OK.
To EDIT OR REMOVE AN EMAIL ADDRESS FROM YOUR LIST:
- Log in to your baby's scrapbook.
- Click on the "Settings" tab on the right side of the page.
- Click on the "Mailing List" tab on the left side of the page.
From here, you can quickly edit or remove email addresses from your mailing list.
Guestbook: Editing
A guestbook is a great way for visitors to your site to say "hi!" and offer their best wishes, etc.
When you set up your scrapbook, a guestbook automatically appears on the scrapbook's top page. If you want to REMOVE it, simply log in and click the REMOVE link above the module. However, "guestbook" is also a tab on the menu bar, so the guestbook function cannot be completely turned off.
If you want to REMOVE A SPECIFIC ENTRY, simply view the list of comments and click DELETE next to the relevant comment.
Settings: Site & Account Tabs
Log on to your account. There are a number of global settings that you can change on the Site & Account tabs, including:
- Your email address (we use this to contact you and forward communication from guests to your site) -- PLEASE keep this current. It's our only way to get a hold of you! Click on ACCOUNT to change.
- Time zone (we use this to auto-fill in the time when you post stories, etc) -- Because we're an American company, we only have U.S. time zones to pick from. Our apologies to our overseas friends! Click on ACCOUNT to change
- Daylight savings time (check it if you have daylight savings where you live) -- Click on ACCOUNT to change.
- Admin/Owner password (this is where you can change your password)-- Click on SITE to change.
- Visitor Access Code (this is where you can turn on / turn off / change the special code people will require to see your site. There is more information about this feature elsewhere in this document.)-- Click on SITE to change.
Turning On/Off or Moving Features Of My Scrapbook
There are lots of cool features in About My Baby, but perhaps the coolest is the ability to turn on or off any features you want, and to put them anywhere you want on the page.
- Login
- Each module will have a tiny little "drag" icon at the top of it.
- Simply hold down your mouse on the 'drag' icon and pull it to where you want it to go. You may have to do it a couple of times to move it from the top of the page to the bottom, or visa versa.
To ADD a module, choose a module from the drop-down at the top, left of the page, choose a side of the page where you want the new module to go, and click ADD.
To REMOVE a module, simply click REMOVE at the top right of the module you don't want, then click "SAVE CHANGES". Please note that you will lose any content in that module if you delete it, so use it wisely!
Changing The Look Of My Scrapbook
Show the world how cool your kid is by changing the color and style of your scrapbook. Do it as often as you like!
- Login
- Click on "SETTINGS," then "TEMPLATES"
- Choose from any of our super-cool templates. Only Pro Subscribers will be able to select Pro Only Templates.
Preserving Your Scrapbook
How Can I Preserve My Scrapbook?
AMB is excited to offer memory stick keepsakes for purchase. We'll take a "snapshot" of your scrapbook and house it in an eco-friendly bamboo memory stick. Give as a gift. Keep for your kids for later! Visit the PRODUCTS tab of your scrapbook for more details and pricing.
Why Can Only The Scrapbook Owner Purchase Keepsakes?
We take your children's security seriously here at AMB. We are not comfortable allowing just anyone to order a copy of your children's scrapbook memories. If Grandma or Cousin Sue would like a keepsake of their own, the scrapbook owner will need to order it for them. That's just one of the ways we help our AMB parents protect their children in this digital age!
Can I Add More To My Keepsake Later?
The keepsakes, just like a hardbound book, are a moment in time snapshot of your scrapbook. We cannot add more content to the same memory stick later. (There are a few technical reasons for this as well as the reality that at some point you have more data than your stick will hold.) Because of that, you can order a new memory stick periodically (like adding chapters to a book) just like you would make a new photo album once the current one is full.
My Home Computer Crashed And I've Lost All My Photos/Videos. How Can I Get My Data Back?
Computer breakdowns happen eventually. Whether it's coffee spilling, a bottle being knocked over - at some point every parent's computer will break down. We always recommend that you back up your precious files in case of catastrophe. Your personal backup should be your first place to recover your photos and videos. If your home backup fails, AMB does offer a digital copy of your photos and videos as part of our keepsake memory sticks, available for purchase under the PRODUCTS tab of your scrapbook.
Create A Template Help
What Is Create A Template?
Create A Template is, well, the coolest thing we've done in a long time. Create A Template allows you, the scrapbook owner, to choose your own backgrounds, colors and fonts for your scrapbook so that you can totally personalize your scrapbook for your child. You can change more than 9 different elements of your scrapbook into countless different templates! You'll be able to control all of the following:
- Site Background Color - Change the entire background color for your entire site. Make it pink, or blue, or anything else you prefer.
- Title Bar Color, Image and Fonts - Put a color in your title bar. Or upload a photo with your child in it. Then, change the color and font of the text so that it best matches the image or color.
- Sections Colors, Images and Fonts - Your scrapbook has many 'sections' on the home page - Photos, Videos, etc. - and you can change the look of the sections on the home page and other pages in your site. You can upload a photo, choose colors and change the font and color of the text.
Creating, Copying, Or Editing A Template
- To create a template, log in, click on the SETTINGS tab, and click the CREATE A TEMPLATE link. Our wizard will walk you through the 4-step process.
- To copy someone else's template, go to their scrapbook, scroll to the bottom of the page and click on the "Get This Template" link. You'll need to log in, and then you'll see that template added to your list of templates. **Note that once a template is copied, all future changes to the original template will NOT change the copy.**
- To copy one of your templates, log in, go SETTINGS -> TEMPLATES, and click the COPY link on the template you'd like to copy. **Note that once a template is copied, all future changes to the original template will NOT change the copy.**
- When you create a template, we ask you for your name (optional), your scrapbook URL (optional), and if you'd like to share your template with others (yes or no). If you agree, then we will post a link at the bottom of your site where others can "copy" it. **Note that once a template is copied, all future changes to the original template will NOT change the copy.**
- Do NOT upload any copyrighted content.
Image Uploading Tips:
- For best quality, title bar images should be 820 x 125 pixels; section title images should be 388 x 50 pixels.
- To make your photo or graphic meet those dimensions, use any image editing program you like. We're big fans of a FREE program called IRFANVIEW - find it at www.irfanview.com.
- We do not "stretch" images - rather, we "tile" (aka repeat) any image that doesn't take up the full required dimensions.
- Any uploaded image will appear OVER any chosen background color. (If you know how to use transparent images, you can create some beautiful effects).
- Obviously, you'll want to choose a font that is readable on top of any image or color you choose. (White-on-white isn't a good idea). If you can't see the text, that's the likely problem.
Color Picking Tips:
- Click the 'brush' icon, which should pop up a rainbow-colored palette of colors; click on any color to select.
- If you know Web hex colors, you can simply enter a color into the box as well.
Account & Billing Issues - Pro Subscriptions
All payments are handled by Paypal. We do not have access to your credit information. Please log on to your account, click SETTINGS, then ACCOUNT. You will be able to see when your subscription expires/auto-renews. You will also see links to view information regarding your paypal account, including what card will be charge at auto-renewal time, how to change cards and how to cancel your subscription if that's what you wish.
Generally speaking, Paypal will autorenew whatever account you have on file with them that's listed as your "primary" funding source (unless you have made arrangements otherwise).
If you would like to change your funding source, please follow these instructions.
- Log on to your Paypal account
- Add the new card or bank account you wish to use by clicking "Profile" from the menu bar (it's on the far right).
- Select "credit/debit cards" or "bank accounts."
- Follow the directions to add the funding source.
- Go back to the "Profile Summary" page.
- Under financial information, click "pay list."
- Select your AboutMyBaby subscription
- You'll be taken to a billing details page.
- Scroll to the bottom, you'll see a list for "funding source."
- Click the "change" button and select the account you want to use.
Please note, canceling an old funding source before you have switched your AMB subscription to a new funding source may trigger a cancellation in Paypal's system. (Frequently this happens when someone moves or a card expires.) It does NOT trigger a cancellation in our system. You are paid through your expiration date listed on your ACCOUNT page (log on, click SETTINGS, click ACCOUNT) whether your Paypal account is active or not. HOWEVER, your subscription will not auto-renew. You will be able to re-subscribe manually after your current subscription expires via a link that will appear on your homepage.
Alternately you can go to http://[your site name].aboutmybaby.com/activate.pl (example, http://IloveAMB.aboutmybaby.com/activate.pl)
Please contact us if you have any concerns regarding your account or billing.
Canceling Your Account
To cancel your subscription, log in and click on SETTINGS, then click ACCOUNT. Then click the CANCEL SUBSCRIPTION link. You will be notified by email when your subscription has been canceled.
Canceling your subscription will stop future auto-renewal. You will still have full use of your site until your Pro Subscription expires.
All payments are final once made and there is no credit for partially-used months/years. Please contact us with any other questions.
Let Us Know If You Have Other Questions
We understand that we can't cover everything in our Help section, so we invite you to drop us a note with any further questions, problems, diaper-changing tips or whatever. We're happy to have you as a customer, and we'll do our best to get back to you promptly (usually the same day). To contact us, send us a note.
Important Legalese About You And Us
Here are links to our Terms Of Service and our Privacy Policy.